We are a 3 person team. Here are our games so far:

Posts Tagged ‘Retro Game’

Retro Game Internals: Contra Random Enemies

Sunday, March 30th, 2014

Random Enemy Spawns

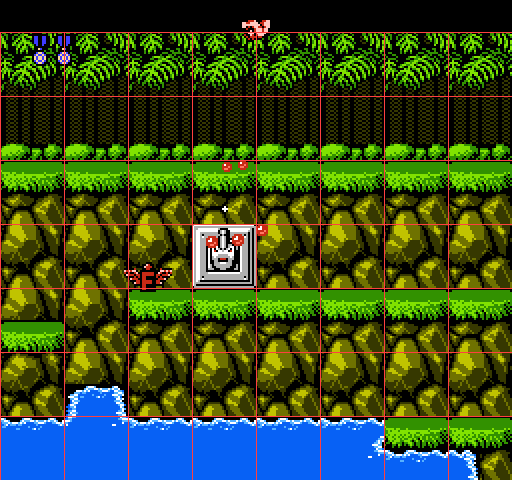
In addition to the enemies that are specifically set up to spawn at certain places in a level, there are also enemies that appear somewhat randomly. These enemies are the running soldiers that are spawned every so often at the edges of the screen as you play through the game. The system that manages these randomly spawned enemies is surprisingly complex given the seemingly simple job it has to do. You can see in the image below the enemies we’re talking about in this post. All of the running soldiers on this screen have been randomly spawned while the player was standing still.

rand_spawn

The heart of the random spawning system is a timer that counts down from some initial value to zero over and over. Each time it reaches zero, there is a chance for an enemy to spawn. Each level has a certain interval that the timer uses and some levels disable random enemy spawns by specifying an interval of zero (the base levels and the final level for example.) There are 2 modifications that are applied on top of the default interval specified by the level to arrive at the final interval that will be used . First, the interval is reduced by roughly 20% for each time that you’ve finished the game. This means that after the game kicks you back to the first level after you beat it, the random enemies spawn more frequently, and even more so if you play all the way through again and again. The other factor that reduces the timer interval is which gun you currently have. Guns are classified according to how good the game considers them to be with P being the worst, F being better, M and L sharing the next best rating and S (of course) being the best. The random spawn timer’s interval will be reduced by about 3% for each rating point (0-3) that your current gun has. The image above is from a 4th play through of the game while the player has the spread gun – the screen shot doesn’t do justice to the amount of guys constantly running onto the screen.

The rate at which the timer counts down is also variable depending on whether or not the screen is currently scrolling forward. If the countdown rate were 1.0 when you are standing still, it would be 0.75 when you are running forward. This has the effect of generating fewer random spawns while you’re moving.  I guess the developers wanted to compensate for the fact that you’ll also be running into the non-randomly spawned enemies while scrolling.

When the timer reaches zero, there is a chance for spawning to happen. Which side of the screen the enemy will come from is usually completely random. The one specific exception is when you are in the first level, and you are in your first play through of the game, and there have been fewer than 30 enemies randomly spawned on the current screen, then the enemies will always spawn on the right side of the screen. This makes it a little easier for brand new players who are just starting out. The Y position for the new enemy to spawn at is chosen in 1 of 3 different ways depending on how many frames have gone by since the game started. One quarter of the time the game looks for a platform to spawn on starting at the top of the screen and searching down. One quarter of the time it starts at the bottom of the screen and searches up. The other half of the time, the game tries to use a random player’s current Y position as the starting Y position for an upward search. There is actually a bug in this logic however that causes the search to start at the very top of the screen half of the time if there is only 1 player alive in the game. This bug doesn’t really harm anything though since the only effect might be that a randomly spawned enemy appears on a lower part of the screen than it should have.

Once a candidate position to spawn an enemy at is found, there are a few more checks to see if spawning should happen. If the candidate position is too close to the top or bottom of the screen then the spawn is rejected (unless you’re in the waterfall level where spawns are allowed to be close to the top of the screen.) If you’re on the very first screen of any level, then the spawn is rejected. Another hard coded test is if you’re on the last few screens of the snowfield level, then spawns from the left side of the screen are always rejected. This test kicks in when you get to the very last snowy platform of the level with the trees at the bottom, bombs being tossed out at you and the 1 guy shooting the stationary gun at you. Why such a specific test is in the game is anyone’s guess. Maybe one of the developers thought it was too hard to deal with so many threats at once (although almost the exact same situation happens at the very beginning of the level and spawns from the left are allowed there.)

One other hard coded test is there to make things a little easier on your first time through the game. If there have been fewer than 30 randomly spawned enemies on the current screen, and you are on your first play through, and a player is standing too close to the side of the screen that an enemy is about to spawn from, then the spawn is rejected. This prevents cheap deaths from enemies randomly spawning right on top of you.

If all of these tests have passed, there is still one more thing that needs to be checked before an enemy can actually spawn. Every single screen in the game has a unique value associated with it that controls various aspects of the randomly spawned enemies on that screen. One thing that an individual screen can control is an extra chance that any given spawn will be rejected. Screens can either always allow spawns, always reject spawns, randomly reject spawns 50% of the time, or randomly reject spawns 75% of the time. If this final test passes then it’s finally time to spawn something.

There are 2 different kinds of spawns that can happen once the game decides that it wants to spawn something. If you are not in the waterfall level, and the screen is currently scrolling, then you have a 25% chance to spawn a group of 3 running soldiers. These soldiers are always configured to never shoot bullets at you. In what might be another bug or might have been on purpose, the game uses what is effectively uninitialized memory to configure the behavior of each of the soldiers with respect to what they do when they hit the edge of the platform that they’re running on (whether they always jump off or if they’re allowed to turn around.) If this was a bug instead of just trying to get random looking behavior then it is again a pretty minor one.

The other kind of spawn that you get if the conditions for the first kind aren’t met is a single running soldier that gets configured slightly differently. In this case, the normal random number generator is used to randomly configure the jumping behavior of the soldier. These soldiers are also assigned a shooting behavior based on another screen specific value. The idea behind this process was that each screen selects one of a small number of pre-made groups of behaviors with each group having a different mix of non-shooting, high shooting and low shooting behaviors. Then, the specific shooting behavior of each soldier that is spawned is picked at random from within the group that the screen selects. However, there is another bug in the game where one specific screen in the hangar level specifies the 8th behavior group when only 7 behavior groups exist. This causes the game to assign soldiers on that screen a garbage behavior value (the actual value comes from part of the pointers to the screen enemy lists that we’ve talked about before) resulting in various non-fatal side effects that mostly result in the soldiers instantly turning around and running off the screen.

Up Next

Who knew spawning some random enemies was so complicated? The next post will cover the final piece of the enemy spawning puzzle which is how enemies work in the “base” levels of the game. As always, feedback is welcome @allan_blomquist or comment below.

(Prev – This is part 3 of a 7 part series – Next)

Retro Game Internals: Contra Levels

Sunday, March 16th, 2014

Tile Map

Each level in the game is made up of a series of independent screens. The image below shows an overview of the first level of the game divided up into the 13 screens that comprise the stage.

screens

Each screen is built from a collection of non-overlapping super tiles which each take up 32×32 pixels worth of screen space. A screen is always made of exactly 8 super tiles across and 7 from top to bottom. This results in a final screen size of 256×224 pixels. The native resolution of the NES is 256×240 pixels so Contra leaves some of the screen space unused rather than trying to deal with splitting super tiles in half to perfectly fill up the display. It was fairly common at the time for console games to not care what they were displaying at the very top and bottom of the screen because it often wasn’t visible on CRT TVs.

The image below shows the 7th screen of the first level of Contra divided up into the 56 super tiles that make up the background.

supertiles

Each super tile is in turn made up of 4×4 regular tiles which are 8×8 pixels each in size. These regular tiles are what the NES hardware actually uses to display background maps so all games need to break their maps down into 8×8 pixel tiles at some point.

Collision Data

The collision information for each screen is derived from the final layout of the regular tiles as opposed to being explicitly authored as a separate map. The resulting collision map is made up of 16×16 pixel blocks of the screen. This means that there are 2×2 regular tiles that make up each block of collision data, but when deriving the collision type for each block, only the upper left regular tile is considered.

Each level defines 4 ranges of tile indices with all of the tiles in each range having 1 of the 4 different collision types. For example in the first level, tiles 0x01 to 0x05 have the collision type for floors that you can land on when falling but pass through when moving left, up and right. Tiles 0x06 to 0xF8 have the empty space collision type. Tiles 0xF9 to 0xFE have the water collision type and tile 0xFF has the completely solid collision type.

The image below shows a part of the first level of the game with the resulting collision map overlaid. Blocks with collision type water are colored blue and blocks with collision that allows you to walk on them but also move through them are colored green. Empty space collision blocks are black and completely solid collision blocks are not used in this section of the level.

collision

Enemies

Each screen has a list of the enemies that need to be spawned into the world as you scroll through it. The list is presorted according to the distance you need to have scrolled the screen in order to spawn the enemy. For example, the first enemy in the first level has a scroll value of 16, so once you start playing and move far enough to the right to scroll the screen 16 pixels, that first enemy is spawned. Because the list is sorted by scroll distance and the screen can only scroll in 1 direction, there is always exactly 1 candidate for the next enemy to be spawned.

The second piece of data in each list entry is the type of enemy to create, along with a count of how many of those enemies to spawn. Then, for each of those count of enemies, there is a generic creation context value and a value that gives the position to spawn the enemy on screen. The creation context has no meaning to the spawning system itself, but will be interpreted later by the enemy’s own update logic. It is used, for example, to configure which kind of power-up a flying power-up balloon will drop, and to control certain aspects of the behavior of the running soldiers. The spawn position value gives only half of the information required to locate the new enemy on screen. For levels that scroll horizontally, the position value will give the y position of the enemy, and the x position will always be the far right side of the screen. If the level scrolls vertically then the spawn position value is the x position of the enemy and the y position is always at the top of the screen. Enemies that seem to spawn from the trailing edge of the screen have logic built in to their enemy specific update logic to warp themselves to the opposite side of the screen as their first action.

The variable length enemies list is terminated by a byte with a magic value and then the game will wait for you to scroll onto the next screen to begin looking for more enemies to spawn from that screen’s enemies list. Enemies are in charge of destroying themselves when they have scrolled off of the screen, there is no system that does it automatically.

(Prev – This is part 2 of a 7 part series – Next)

Retro Game Internals

Monday, March 10th, 2014

Like a lot of people doing programming for video games, I played a lot of NES games when I was a kid. It has always amazed me how they were able to get so much out of so little, and so I’ve spent a good amount of time over the years dissecting certain games to see how they work. Today I’m starting a series of blog posts in which I want to document what I’ve learned, from a game programmer’s point of view. I’m going to try to focus on how the game systems work at the game/engine level and not at the hardware level (so more like how does this game decide which things it wants to draw on this frame as opposed to how do sprites work on the NES.) I’ll also try to throw in any tidbits about the games that I think are interesting like things that weren’t obvious to me just from playing the game casually or instances of bugs in the game’s logic.

Contra Introduction

The first game that I’m going to write about is Contra on the NES. The remainder of this post will be a short overview of the objects and data that exist in a game of Contra and then subsequent posts will go into more detail about each system the game uses to manipulate its model of the world. The basic model that the game maintains is made up of:

  • Player characters
  • Player bullets
  • Enemies and other objects
  • Level data

The player characters are the main heavyweight objects of the game and have lots and lots of code that explicitly deals with them as you might expect. The bullets from player characters are treated differently from every other kind of object in the game for reasons that are probably performance related. We’ll see later on how the player bullets being separated out from the other game objects makes various things the game has to do more efficient. The final class of objects are the enemies which are managed by a simple entity system. This includes the enemies themselves along with enemy bullets and explosions, but also a couple of friendly things like flying power-up balloons and power-ups sitting on the ground. I’ll use the term enemies to refer to all of these things just to have a more descriptive term for them than “objects.” The key feature is that there is code in the game that deals with them abstractly as opposed to the player characters and player bullets which are always manipulated by specialized code.

The tile based level data is the final major part of the game simulation. Contra features standard horizontal levels along with a vertical level and pseudo-3D levels. Levels only support moving forward through them, never backwards. The game maintains a double buffer of tiles that hold collision and visual data for the current screen in the first buffer, while it builds the next screen in the second buffer. We’ll see later on how the level data is organized, how it is updated as you make your way through the levels and how enemies are spawned from it.

Up Next

I have a rough outline of where I’d like to go from here with this series but it’s still very much a work in progress. Topics I have ear marked to talk about include data representations, enemy behavior, scrolling, collision detection, random number generation, player control and other assorted things. I’d love to get feedback about what people might be interested in going forward. You can leave a comment below or reach me on twitter @allan_blomquist

(This is part 1 of a 7 part series – Next)