We are a 3 person team. Here are our games so far:

Author Archive

Retro Game Internals: Contra Conclusion

Monday, May 12th, 2014

To round out my discussion of Contra I’m going to cover a few miscellaneous topics that don’t warrant a full writeup on their own. Some of these things are details of the game’s programming and some are just interesting things about the game itself that I never knew before. I’ll start off with a table of contents for this series for easy reference and then dive into the last few details.

Previous Posts about Contra

Random Numbers

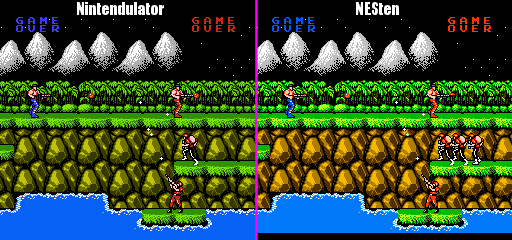
Contra has a single global 8-bit value that it uses as the source of randomness throughout the game. The way that it updates the random value each frame is kind of interesting in that it doesn’t implement any particular algorithm that you can call on once per frame to get the next number in the sequence. Instead, the next random value is generated by spinning in a tight loop during the time that the game is idle and waiting for the next display frame to begin (while waiting for the vblank interrupt.) During that time, the game continually adds the current frame counter value into the random number over and over again until the video hardware in the NES signals to the game that it’s time to begin processing for the next display frame. One consequence of this approach is that the particular sequence of random numbers you’ll get is heavily dependent on the exact cycle level operation of the CPU and the interaction between the CPU and the video hardware. That means that even if two emulators implement the logic of the CPU instructions perfectly, they will still generate different random sequences if their timing is not exact. You can see an obvious manifestation of this in the attract mode of Contra which plays back a pre-recorded stream of button input and relies on determinism to replay the demo exactly the same each time. Below is a side by side comparison of the same frame of the attract mode running on two different emulators. Notice that the running soldier that has randomly spawned on the lower right part of the screen selected a single spawn when running on Nintendulator and a triple spawn when running on NESten. This is because the sequence of random numbers being generated by the two instances of the game is not the same. Fortunately, the influence of the random numbers is small enough to not completely break the attract mode playback.

prng_difference

Structure of Arrays

Contra stores all of its data about enemies and bullets in structure-of-arrays format instead of the more object oriented array-of-structures format. The reason for this doesn’t have to do with CPU cache utilization or SIMD instructions like you might expect, but is instead a consequence of the NES having 16-bit memory addresses but only 8-bit CPU registers. If you want to access data indirectly through a pointer, you can’t store the address of the object in the pointer and then hard code the offset to the member you want in the load instruction because the address of the object probably won’t fit into a CPU register. Instead, you need to flip everything around and hard code the full 16-bit address of an array of members for multiple objects into your load instruction and then use the register to hold the offset within the array to get to the member that belongs to the object that you’re interested in.

Screen Space

In Contra, everything happen in screen space. The positions of the players and the positions of the enemies and bullets are all stored and manipulated within the coordinate system of the screen (i.e. a position of 0 always means the point in space that is currently at the left side of the screen, no matter where within the level the screen has scrolled to.) This is an optimization that seems a little counter intuitive at first because you would think that storing all of your positions in screen space would make things like scrolling a lot more complicated. Now instead of just changing a single scroll position variable to scroll the screen, you have to manually move the positions of every enemy, player and bullet every frame to simulate scrolling. The reason that this actually ends up being a good thing to do is that it saves a lot more time than it costs each frame. Scrolling is more complicated, but it really just boils down to adding 1 extra number into an object’s position as it updates each frame which is often just 1 extra CPU instruction per game object. The big win is that now all calculations related to the positions of things can be done using 8-bit values (the NES screen is 256×240 pixels so you can locate any position on screen with pixel precision using a single byte for X and Y.) Since the NES only supports 8-bit arithmetic natively this ends up being way faster than trying to emulate 16-bit arithmetic to handle 16-bit world positions. This of course only works for a game like Contra where the relationship between world space and screen space is a simple translation without any scaling or rotation possible (i.e. transforming from world to screen space happens to be commutative with other translations even though applying transforms is not commutative in general.) If the camera could zoom out in the game then things would start moving too fast and if the camera could rotate then things would go in the wrong direction.

Subtle Behavior

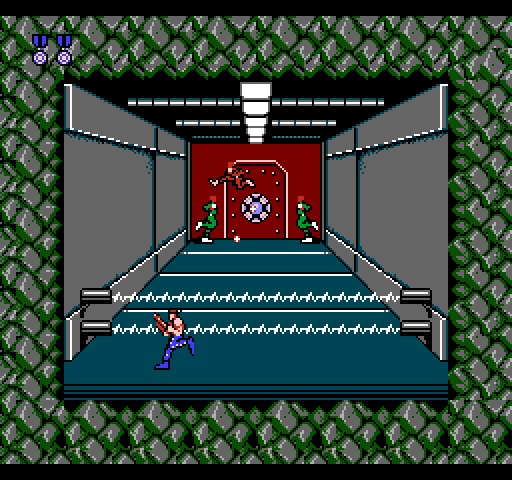
There are a number of things in Contra that change according to how many times you’ve played through the game in a single sitting, and which gun you currently have. The following is a complete list of the differences, where FINISHED would be 0 the first time through the game, 1 the second time through, etc. and GUN is 0 for your default weapon, 1 for Fire, 2 for Machine gun or Laser and 3 for Spread:

  • Level 8 mid boss and final boss HP = 55 + (16 * FINISHED) + (16 * GUN)
  • Level 8 mid boss projectile HP = 2 + FINISHED
  • Level 8 mouth things in wall HP = 4 + (2 * FINISHED) + GUN
  • Level 8 scorpions HP = 2 + FINISHED + GUN
  • Level 8 pods around final boss HP = 24 + (2 * FINISHED) + (2 * GUN)
  • Level 6 boss HP = 64 + (8 * GUN)
  • Red cannons that comes up out of the ground wait less time to begin shooting at you for greater FINISHED
  • Random enemy spawns are more frequent with greater FINISHED and GUN, and when FINISHED is 0 they take care not to spawn right on top of you and only spawn on the right side of the screen in the first level
  • Gray turrets in walls rotate to target you faster, and wait less time to target again after shooting bullets with greater GUN
  • Soldiers that shoot bullets tend to shoot more bullets per round with greater GUN
  • Cannons on screen for level 2 and level 4 bosses, as well as the bosses themselves, wait less time between shooting at you for greater GUN
  • Level 8 mid boss shoots 3 projectiles at a time when GUN is 3, but only 2 otherwise
  • Speed at which scorpions drop down on you from the ceiling during final boss fight increases proportional to GUN

Conclusion

Contra is one of my favorite games on the NES and as a game programmer it was a lot of fun to dive in and figure out exactly how it works. I’m always amazed at how much game developers of the time were able to get out of hardware that is ridiculously slow and limited compared to today’s consoles. If you have any feedback about this series of posts please let me know so I can come up with a plan for if/when/what I’ll cover next. You can reach me on twitter @allan_blomquist or comment below.

(Prev – This is part 7 of a 7 part series)

Retro Game Internals: Contra Player Control

Monday, May 5th, 2014

Player Physics

The code that controls the low level player movement in Contra is very simple compared to what’s possible with a modern physics engine.  At the same time, I’ve always enjoyed the super responsive feel that a lot of older games have compared to games with more physically realistic controls. The data associated with low level motion in Contra is basically just a 2D position and velocity. Both are represented in 8.8 fixed point format with units of pixels, and pixels / frame respectively. Each frame, the game determines what the current velocity should be for a player and then simply adds that velocity into the player’s position. Horizontal velocity is always reset to 0 at the beginning of a frame so there is never any continuous acceleration in the X direction (so no ice physics are possible in Contra.)  Enemy characters in the game don’t even get their own dedicated memory to keep track of velocity because a lot of them don’t move. Those enemies that do move usually just manually add some constant amount to their current position each frame.  In the rare case that an enemy does need more complex movement, they implement their own version of what they need to do, not sharing any physics code with the player characters.

In general, there is no physics system that is always running to manage the movement of the players. Instead, certain calculations related to player movement are performed explicitly each frame depending on what exactly the player is doing at the time. For example, when the player is running along the ground, the play control code is setting the player’s horizontal velocity and checking for collisions at the player’s feet to see if you should start falling. However, the player’s vertical velocity is not being updated or even added into the player’s Y position at all.  Also, collisions are not being checked for above the player’s head because the player is known to not be moving up while running. This differs from the more general approach to physical simulation where gravity would be constantly pulling the player down into the ground and a reaction would be constantly moving the player back up to resolve the collision. Similarly, while jumping, collisions are only checked for above the player’s head while the player is moving up during the first part of the jump. Once the peak of the jump is reached and the player starts moving down, the code switches to checking for collisions below the player to see if you’ve landed yet. Also while jumping, vertical acceleration is applied by manually adding a fixed value into the player’s Y velocity each frame. There is no general acceleration variable that is always being added into the player’s velocity but that happens to only get a non-zero value during a jump. There are no wasted collision checks and no wasted math is performed to calculate the movement of the player. Only the relevant details are processed explicitly each frame and this contributes to a very tight feeling control scheme without much emergence of behavior.

Player States

At the next higher play control level above the low level physics code, it’s common to define a set of possible states that the player can be in and then update the player each frame according to the current state. Contra effectively implements this kind of system although it doesn’t actually use a single value to keep track of the current state of the player. Instead, players have multiple groups of flags that indicate what kind of state the player is currently in. The major groups are the jumping flags, falling flags and water flags. When the player is on the ground all of these flags are clear. If you press A to jump, the jumping flag is set and some other jump specific flags are updated according to which direction you’re trying to move and which direction you were facing when you left the ground. A similar set of flags exists for falling which is the state you go into when you run off the edge of a platform or jump down through the ground. The water flags are used only in the first level when you enter the water and start swimming. These flags are never used at the same time (i.e. you’ll never find both the jumping and falling flags set at the same time) so I’m not sure why a single state variable wasn’t used instead. It’s common for play control functions to start off by testing the various flags and then jumping off to specific parts of their code depending on which flag they find set.

Control Details

Running in Contra is instant on / instant off unlike some other games like Super Mario Bros. that impart the player character with some momentum. As mentioned earlier, this is a result of the horizontal velocity of the player being reset to zero at the start of each frame and then updated to the desired value depending on what the player is doing. If the player is running on the ground and you stop pressing left or right, then the horizontal velocity remains set to zero and the character instantly stops moving forward.

Jumping and falling have a slightly different behavior where once you start moving forward or backward, you will continue to move in that direction until you either collide with something or press the opposite direction to move the other way instead. Once you’re moving horizontally in the air, you aren’t able to stop moving horizontally until you land. This is similar to the spinning jump in Metroid and differs from games like Mega Man where you will stop moving in the air if you let go of your button input. Contra’s jump behavior is implemented by a pair of flags that are part of the jumping flags as described earlier. Pressing left or right during a jump will cause the corresponding left or right jump flag to turn on, but releasing the buttons does not cause the flags to turn off. Then, your horizontal velocity during a jump is set based on the current value of the flags and not directly from your current button input.

Contra also allows you to jump down through the ground to lower platforms by holding down on the controller and pressing the jump button. This same mechanic is also used in games like Chip ‘n Dale Rescue Rangers on the NES, but is absent from games with similar “one way” platforms (platforms that you can pass through while jumping up from below, but that you land on when falling down onto them) like Super Mario Bros. 2. In Contra, when you press A while holding down on the controller, the player’s falling flag is set instead of the jumping flag. In order to allow you to pass through the ground, the game records the location on screen that is 20 pixels (a little more than one full collision tile) below your current Y position. Then, as you fall down, the collision check that is normally performed at the player’s feet when in the falling state is skipped while the player’s current Y position is still above that recorded value.

Up Next

The next post will be the final installment in my series on Contra. I’ll cover a bunch of miscellaneous details that I think are interesting but don’t fit in anywhere else. If there’s anything that I haven’t covered so far that you’d like to know about how the game works let me know on twitter @allan_blomquist or leave a comment below!

(Prev – This is part 6 of a 7 part series – Next)

Retro Game Internals: Contra Collision Detection

Monday, April 14th, 2014

Collision Detection

There are two kinds of collisions that can happen in a game of Contra: object vs. object collisions, and object vs. level collisions. Each is handled by completely different code and detected using completely different data, so they are basically two separate systems.

Object vs. Object Collision

In the first post of this series, I mentioned that the game keeps track of three different kinds of objects: players, bullets from players, and enemies. Collision detection is one of the areas where this separation comes into play. Instead of checking for collisions between any and all of these objects, the game only checks collisions between the groups that will react to each other. Players never interact with other players or their bullets, and enemies never interact with other enemies, so the only collisions that matter are those between players and enemies, and those between player bullets and enemies.

Given that enemies are always involved in the object/object collisions that matter, collision detection between objects is done as part of updating all of the enemies. Each frame, the game loops over each active enemy and runs its particular update logic. After an enemy updates, the collision system kicks in and checks that enemy for collisions with players, and then collisions with player bullets. Each enemy has a pair of flags that can be used to indicate to the collision system whether either or both of these kinds of collisions are enabled for that enemy. This is how some enemies, like the bodies of turrets, are able to be shot by the player (by allowing collisions with player bullets) but not able kill you if you walk into them (by not allowing collisions with players.) Beyond these flags, no special logic is used to narrow down the list of potential collisions for an enemy. Every enemy is simply checked against every player and every bullet.

Checking for a collision between a given enemy and a given player is based on a point vs. rectangle test. The point that represents the player’s current position is checked against the rectangle that represents the current hit box that the enemy is using. If the point is inside the rectangle at the moment the check is performed then a collision has occurred. At first glance this seems a little strange. You need the player to be able to be shot in the head as well as the feet, but only the point that represents the player’s current position (which is usually fairly close the the center of the player sprite) is checked for collision with the enemy hit box. The key to making the system work is that the enemy hit boxes are not just tight bounds around the enemy sprites themselves, but rather representations of the area where collisions would occur if we were doing a more traditional rectangle vs. rectangle test. Put another way, the hit boxes that enemies use represent the space where the player position would have to be to make the player sprite overlap the enemy sprite.

collide_obj

You can see this process in action in the image above. In each of the three sections, the player’s position is indicated by a single green pixel in the center of a green circle. The pink rectangle represents the hit box that the white enemy bullet is using to check for collisions against the player’s position. Notice how the enemy bullet uses a different hit box depending on what the player is doing. This is how the game effectively changes where the player is vulnerable without actually having a hit box around the player to work with. Each enemy has a version of their hit box to use against a player in the water, a jumping player, a player on the ground, a standing/running player, and a player bullet. The particular type of player bullet is not taken into account when picking a hit box to test against so there is no difference between the different guns you can get from a bullet collision perspective.

Object vs. Level Collision

Collisions between objects and the level itself are not handled by a system in the way that collisions among objects are. Instead, level collisions are tested for directly wherever they are needed. If a player needs to know if he has run off the end of a platform then the code that updates a running player will query for a collision at the player’s feet every frame until it finds that there is nothing there. Most enemies don’t need to know about collisions with the level at all, but those that do will similarly check for them at specific times as needed. The only kind of query that is supported is checking a point against the level collision map that we’ve talked about before. The collision query returns the collision code for tile under the point that was checked (empty, solid, water or platform) and then the caller will do whatever it needs to in response to the different results.

3D Collision

Collisions in the pseudo-3D base levels work almost exactly the same as in the 2D levels but with certain constraints to make the effect hold up in fake 3D. Enemies are not allowed to collide with the player if their screen space Y position is too small (i.e. too far toward the top of the screen which means too far back “into” the screen.) This works because players are known to always be at the bottom of the screen during these levels. Player bullets are timed and only allowed to collide with most enemies once they have been on screen long enough to have reached the “back” of the room. For enemies that can be shot at any Z position within the room (like the rolling grenades that you have to blow up before they roll down and kill you) the timer on your bullets is not used. Instead, a flag is checked to see if your bullet was fired while you were lying on the ground, and if so, normal 2D collision detection is allowed to continue as usual. This works only because you are detecting a collision between two objects that are both known to be on the ground where Y position maps directly to Z position (i.e. if two things look like they are colliding in 2D, then you know they are colliding in 3D as well, but only along the ground.) With these constraints in place, the normal, flat 2D collision detection system can be used to detect collisions between objects even in a pseudo-3D environment.

(Prev – This is part 5 of a 7 part series – Next)

Retro Game Internals: Contra Base Enemies

Saturday, April 5th, 2014

Static Base Enemies

The enemies in the pseudo-3D “base” levels in Contra are spawned by a slightly different system compared to the other kinds of levels. Base levels are also divided up into screens, and each screen also gets its own list of enemies that it needs to spawn, but the details of the list are different.

baseenemies

The screens in the base levels do not scroll, so each enemy in the screen enemy list is spawned the moment you enter the screen. Each enemy list starts off with a count of how many targets need to be destroyed on that screen in order to lower the electric barrier and allow you to move forward. The game actually has a bit of unused logic to lower the barrier right away if there are no targets even though there are no screens in the final game that are set up this way. The rest of the enemy list consists of a series of records for each enemy that needs to be spawned. The first piece of data in each record gives the X and Y position for where the enemy should spawn on screen. The second piece of data in each record gives the enemy type to spawn, and the third and final piece is an opaque creation context value just like the one in the enemy lists for the other kinds of levels.

At the moment that you enter a new screen, all of the enemies on that screen’s enemy list are spawned and the list is never referenced again. These enemies are mostly just the stationary things on the back wall like the targets and guns that shoot at you. All of the other enemies that run onto the screen while you’re playing are not spawned through the screen’s enemy list. Instead, they are handled by a different system.

Sequenced Base Enemies

One type of object that is a part of the enemy list for every screen in a base level isn’t actually a visible enemy, but an entity whose job it is to manage all of the enemies that run in from the sides of the screen as you play. This spawner entity processes its own completely separate enemy list for each screen that tells it which enemies to spawn and when. These enemy lists also contain a series of records, one for each enemy that needs to be spawned. The first piece of data in each record determines which kind of enemy to spawn and gives the creation context value for that enemy. The second piece of data gives a delay time to wait before spawning the next enemy. There is also a flag associated with each record that tells if that record is the final one for that screen. Once the final record has been processed, the spawner entity loops back to the first record and begins repeating the same pattern of enemies over and over. Once the whole pattern has been run through 7 times on a single screen, the spawner entity destroys itself so no more enemies will be spawned. This is what triggers the targets on the walls to begin shooting bullets at the player.

Power-up Enemies

On some of the screens in base levels you encounter a red jumping enemy that gives you a power-up when killed. The appearance of these enemies is mostly just specified by the secondary enemy list that the enemy spawner follows, but with the additional rules that only 1 of these red enemies can spawn on any given screen, and you can not spawn a red enemy during the first pass through the secondary enemy list. The creation context data for the jumping enemy in the spawner’s enemy list determines whether or not it can be one that carries a power-up, and if so, what kind of power-up it will drop when killed by the player. The 1 enemy per screen rule applies to spawning the enemy, not killing it, so if you miss the red enemy the first time you won’t get another one again on that screen.

(Prev – This is part 4 of a 7 part series – Next)

Retro Game Internals: Contra Random Enemies

Sunday, March 30th, 2014

Random Enemy Spawns

In addition to the enemies that are specifically set up to spawn at certain places in a level, there are also enemies that appear somewhat randomly. These enemies are the running soldiers that are spawned every so often at the edges of the screen as you play through the game. The system that manages these randomly spawned enemies is surprisingly complex given the seemingly simple job it has to do. You can see in the image below the enemies we’re talking about in this post. All of the running soldiers on this screen have been randomly spawned while the player was standing still.

rand_spawn

The heart of the random spawning system is a timer that counts down from some initial value to zero over and over. Each time it reaches zero, there is a chance for an enemy to spawn. Each level has a certain interval that the timer uses and some levels disable random enemy spawns by specifying an interval of zero (the base levels and the final level for example.) There are 2 modifications that are applied on top of the default interval specified by the level to arrive at the final interval that will be used . First, the interval is reduced by roughly 20% for each time that you’ve finished the game. This means that after the game kicks you back to the first level after you beat it, the random enemies spawn more frequently, and even more so if you play all the way through again and again. The other factor that reduces the timer interval is which gun you currently have. Guns are classified according to how good the game considers them to be with P being the worst, F being better, M and L sharing the next best rating and S (of course) being the best. The random spawn timer’s interval will be reduced by about 3% for each rating point (0-3) that your current gun has. The image above is from a 4th play through of the game while the player has the spread gun – the screen shot doesn’t do justice to the amount of guys constantly running onto the screen.

The rate at which the timer counts down is also variable depending on whether or not the screen is currently scrolling forward. If the countdown rate were 1.0 when you are standing still, it would be 0.75 when you are running forward. This has the effect of generating fewer random spawns while you’re moving.  I guess the developers wanted to compensate for the fact that you’ll also be running into the non-randomly spawned enemies while scrolling.

When the timer reaches zero, there is a chance for spawning to happen. Which side of the screen the enemy will come from is usually completely random. The one specific exception is when you are in the first level, and you are in your first play through of the game, and there have been fewer than 30 enemies randomly spawned on the current screen, then the enemies will always spawn on the right side of the screen. This makes it a little easier for brand new players who are just starting out. The Y position for the new enemy to spawn at is chosen in 1 of 3 different ways depending on how many frames have gone by since the game started. One quarter of the time the game looks for a platform to spawn on starting at the top of the screen and searching down. One quarter of the time it starts at the bottom of the screen and searches up. The other half of the time, the game tries to use a random player’s current Y position as the starting Y position for an upward search. There is actually a bug in this logic however that causes the search to start at the very top of the screen half of the time if there is only 1 player alive in the game. This bug doesn’t really harm anything though since the only effect might be that a randomly spawned enemy appears on a lower part of the screen than it should have.

Once a candidate position to spawn an enemy at is found, there are a few more checks to see if spawning should happen. If the candidate position is too close to the top or bottom of the screen then the spawn is rejected (unless you’re in the waterfall level where spawns are allowed to be close to the top of the screen.) If you’re on the very first screen of any level, then the spawn is rejected. Another hard coded test is if you’re on the last few screens of the snowfield level, then spawns from the left side of the screen are always rejected. This test kicks in when you get to the very last snowy platform of the level with the trees at the bottom, bombs being tossed out at you and the 1 guy shooting the stationary gun at you. Why such a specific test is in the game is anyone’s guess. Maybe one of the developers thought it was too hard to deal with so many threats at once (although almost the exact same situation happens at the very beginning of the level and spawns from the left are allowed there.)

One other hard coded test is there to make things a little easier on your first time through the game. If there have been fewer than 30 randomly spawned enemies on the current screen, and you are on your first play through, and a player is standing too close to the side of the screen that an enemy is about to spawn from, then the spawn is rejected. This prevents cheap deaths from enemies randomly spawning right on top of you.

If all of these tests have passed, there is still one more thing that needs to be checked before an enemy can actually spawn. Every single screen in the game has a unique value associated with it that controls various aspects of the randomly spawned enemies on that screen. One thing that an individual screen can control is an extra chance that any given spawn will be rejected. Screens can either always allow spawns, always reject spawns, randomly reject spawns 50% of the time, or randomly reject spawns 75% of the time. If this final test passes then it’s finally time to spawn something.

There are 2 different kinds of spawns that can happen once the game decides that it wants to spawn something. If you are not in the waterfall level, and the screen is currently scrolling, then you have a 25% chance to spawn a group of 3 running soldiers. These soldiers are always configured to never shoot bullets at you. In what might be another bug or might have been on purpose, the game uses what is effectively uninitialized memory to configure the behavior of each of the soldiers with respect to what they do when they hit the edge of the platform that they’re running on (whether they always jump off or if they’re allowed to turn around.) If this was a bug instead of just trying to get random looking behavior then it is again a pretty minor one.

The other kind of spawn that you get if the conditions for the first kind aren’t met is a single running soldier that gets configured slightly differently. In this case, the normal random number generator is used to randomly configure the jumping behavior of the soldier. These soldiers are also assigned a shooting behavior based on another screen specific value. The idea behind this process was that each screen selects one of a small number of pre-made groups of behaviors with each group having a different mix of non-shooting, high shooting and low shooting behaviors. Then, the specific shooting behavior of each soldier that is spawned is picked at random from within the group that the screen selects. However, there is another bug in the game where one specific screen in the hangar level specifies the 8th behavior group when only 7 behavior groups exist. This causes the game to assign soldiers on that screen a garbage behavior value (the actual value comes from part of the pointers to the screen enemy lists that we’ve talked about before) resulting in various non-fatal side effects that mostly result in the soldiers instantly turning around and running off the screen.

Up Next

Who knew spawning some random enemies was so complicated? The next post will cover the final piece of the enemy spawning puzzle which is how enemies work in the “base” levels of the game. As always, feedback is welcome @allan_blomquist or comment below.

(Prev – This is part 3 of a 7 part series – Next)