


Tile Map
Each level in the game is made up of a series of independent screens. The image below shows an overview of the first level of the game divided up into the 13 screens that comprise the stage.
![]()
Each screen is built from a collection of non-overlapping super tiles which each take up 32×32 pixels worth of screen space. A screen is always made of exactly 8 super tiles across and 7 from top to bottom. This results in a final screen size of 256×224 pixels. The native resolution of the NES is 256×240 pixels so Contra leaves some of the screen space unused rather than trying to deal with splitting super tiles in half to perfectly fill up the display. It was fairly common at the time for console games to not care what they were displaying at the very top and bottom of the screen because it often wasn’t visible on CRT TVs.
The image below shows the 7th screen of the first level of Contra divided up into the 56 super tiles that make up the background.
Each super tile is in turn made up of 4×4 regular tiles which are 8×8 pixels each in size. These regular tiles are what the NES hardware actually uses to display background maps so all games need to break their maps down into 8×8 pixel tiles at some point.
Collision Data
The collision information for each screen is derived from the final layout of the regular tiles as opposed to being explicitly authored as a separate map. The resulting collision map is made up of 16×16 pixel blocks of the screen. This means that there are 2×2 regular tiles that make up each block of collision data, but when deriving the collision type for each block, only the upper left regular tile is considered.
Each level defines 4 ranges of tile indices with all of the tiles in each range having 1 of the 4 different collision types. For example in the first level, tiles 0x01 to 0x05 have the collision type for floors that you can land on when falling but pass through when moving left, up and right. Tiles 0x06 to 0xF8 have the empty space collision type. Tiles 0xF9 to 0xFE have the water collision type and tile 0xFF has the completely solid collision type.
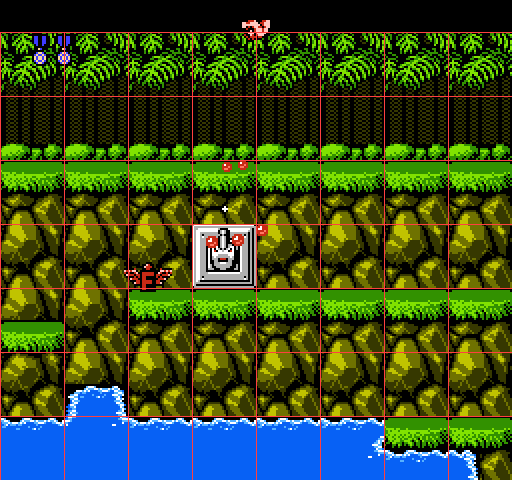
The image below shows a part of the first level of the game with the resulting collision map overlaid. Blocks with collision type water are colored blue and blocks with collision that allows you to walk on them but also move through them are colored green. Empty space collision blocks are black and completely solid collision blocks are not used in this section of the level.
Enemies
Each screen has a list of the enemies that need to be spawned into the world as you scroll through it. The list is presorted according to the distance you need to have scrolled the screen in order to spawn the enemy. For example, the first enemy in the first level has a scroll value of 16, so once you start playing and move far enough to the right to scroll the screen 16 pixels, that first enemy is spawned. Because the list is sorted by scroll distance and the screen can only scroll in 1 direction, there is always exactly 1 candidate for the next enemy to be spawned.
The second piece of data in each list entry is the type of enemy to create, along with a count of how many of those enemies to spawn. Then, for each of those count of enemies, there is a generic creation context value and a value that gives the position to spawn the enemy on screen. The creation context has no meaning to the spawning system itself, but will be interpreted later by the enemy’s own update logic. It is used, for example, to configure which kind of power-up a flying power-up balloon will drop, and to control certain aspects of the behavior of the running soldiers. The spawn position value gives only half of the information required to locate the new enemy on screen. For levels that scroll horizontally, the position value will give the y position of the enemy, and the x position will always be the far right side of the screen. If the level scrolls vertically then the spawn position value is the x position of the enemy and the y position is always at the top of the screen. Enemies that seem to spawn from the trailing edge of the screen have logic built in to their enemy specific update logic to warp themselves to the opposite side of the screen as their first action.
The variable length enemies list is terminated by a byte with a magic value and then the game will wait for you to scroll onto the next screen to begin looking for more enemies to spawn from that screen’s enemies list. Enemies are in charge of destroying themselves when they have scrolled off of the screen, there is no system that does it automatically.
(Prev – This is part 2 of a 7 part series – Next)
Tags: Allan Blomquist, Retro Game, Retro Game Internals, Tomorrow Corporation

Awesome!
It’s neat to see how deceptively simple these old games are, but how they’re actually quite complex under the hood, and have really well-thought-out systems for how the game fits together as a whole. Thanks for doing this! As an aspiring game dev, myself, it’s really cool to see how this is set up. Gives me ideas for my own game design!
Also plz release LI source so we can see how that’s set up too kthxbai.
Interesting! It’s nice to see how such games are put together, that spawning system bit in particular was a very nice read. Enemies warping themselves to the other side of the screen is a neat way to handle them appearing from the trailing side!
Neat. I didn’t know that those old NES games like this one had all this complicated mechanisms and enemies handling and such. Really looking forward to the next part of this blog!
Gooood stuff! I’m always blown away by how great these classic games were, especially given the designers and developers were all in largely uncharted territory.
Hello! Thanks for your work – the article is awesome!! Do you have any ideas why hitboxes are changed is a such strange manner (player lies down – bullets’ hitboxes updated instead of his own)? And how does it work when there are two players in different positions (one stays, second lies).
The reason that collision tests work the way they do is just for efficiency. It would be more intuitive for every game object to have its own bounding rectangle and to check for collisions by seeing where those rectangles overlap on the screen. However, doing a rectangle vs. rectangle intersection test would take more CPU time than the point vs. rectangle test that the game actually uses. The weird hit boxes that the enemies use to test for their collisions are just the result you get when you transform the data you would need to do the rectangle vs. rectangle test into the corresponding data you need to do the same test as point vs. rectangle instead.
Handling two players is no problem because the enemies themselves don’t really store the data for their current hit box directly. Instead, the code that handles collision detection looks up the proper hit box to use based on the current state of the player and enemy being compared. That look up will use player 1’s state when checking for collisions with player 1 and player 2’s state when checking for collisions with player 2.